Datenimport/en: Unterschied zwischen den Versionen
Haemel (Diskussion | Beiträge) |
Haemel (Diskussion | Beiträge) |
||
| Zeile 36: | Zeile 36: | ||
=== General Settings === | === General Settings === | ||
| − | *'' | + | *''File Type (Content)'' |
| − | : | + | :Type of the file to be imported: |
| − | #'' | + | #''Categories:'' Import of category data only |
| − | #'' | + | #''Products:'' Import and update of product and category data |
| − | #'' | + | #''Inventory:'' Updating of inventory data (visible only after products have already been created) |
*''Column Mapping Template'' | *''Column Mapping Template'' | ||
Version vom 4. Januar 2019, 16:09 Uhr
The Data Import offers the opportunity to integrate product data from CSV, XML, or other files into the DataPool as master data or to update already imported records. Every data import can be set up to run completely automated - via cronjobs. Additionally, all Data Import settings can be saved in a custom import template.
Data can be imported from various sources. Choose one of the options.
Inhaltsverzeichnis
Import Options
Select a file and - if already present - a suitable template. In import templates, the assignments between the columns in your import file and the fields in the DATAPOOL can be saved. Thus, the individual field assignments must not be re-established for each import. Importing of data can be repeated very quickly and as often as desired. If you change existing assignments during an import, the used import template is thereby also changed.
If you are importing an XML file, a check mark must be set in "XML-data" box.
Watch out!
MS-Excel files must not contain macros or formulas. These cause unexpected errors during the import.
After your file has been imported, a new window will appear ...
Option A: Import File from PC
Upload an import file from your local computer.
Option B: Import File from URL
Specify an HTTP or FTP address. To import from an FTP server, you must first make the required settings under: My Account -> Base Settings -> FTP data.
Variante C: Import Internal Supplier Data
If data of a supplier on csv4you already has been activated for you, you can import the relevant product data into a new data source here.
Your file has been loaded
Set the properties for the file to import. Depending on the file type, the displayed properties can vary. It will also give you the file name and the number of temporarily recognized records are shown.
Watch out!
Item numbers (Item IDs) can be a maximum of 50 characters long.
General Settings
- File Type (Content)
- Type of the file to be imported:
- Categories: Import of category data only
- Products: Import and update of product and category data
- Inventory: Updating of inventory data (visible only after products have already been created)
- Column Mapping Template
- Please note, that a selected template for column mapping should match the file type.
CSV-Specific Settings
- Separator
- Specify the data- or column separator that is used in your import file.
- Text Qualifier
- Specify the text qualifier that is used in your import file.
- Headers in Row
- Specify which row contains the column labels (usually this is the 1st)
XML-Specific Settings
- XML-element of the product data
- Enter the XML-element of the actual product entries, e.g .: product
- Variants
- XML-element for Variants, z.B.: product->variant
Then press the button [Apply these Settings] for a current view in the area Assign your columns to the master data in the DATAPOOL.
Cell Mapping und Import Options
[ Master Data Mapping ]
Assigning your columns contents to the fields in the DATAPOOL
- Field name in database
- List of available fields in the system
- A maximum of 20 additional fields can be defined via DATAPOOL -> Base Settings -> Data Source -> Actions -> Edit Additional Data Feelds. These should then appear here as field names.
- Columns of the File
- Column names of your import file.
- Assign the column names of your import file to a corresponding field in the DATAPOOL. Categories can also get created and updated via the product import. Any space in the ID field is converted automatically to an underscore.
- Advanced options
- Allows you to assign a fixed value as the content of a field, for example, NEW.
- In addition, the content from several columns of your import file can be assigned to a single field in the DATAPOOL. For this, put your field names in square brackets. Example: [title] - [EAN]
[ Additional Language Sets ]
If you have activated additional languages, they are displayed here.
Datenfelder für zusätzliche Sprachen, falls in Ihrer Importdatei vorhanden.
[ Import Options ]
Select Import Options
- Create missing items in the Data Pool
- If items are found during the import, which are not already present in the Data Pool, they will be created (items with changed product ID are also considered new items). Deselect this option, if only a synchronization of already existing items shall be made.
- Data sets even without an own ID
- Data sets without unique ID are also imported (by default). Do you want to make sure that only those records with a unique ID get imported, remove the check mark.
- Remove formatting from the text!
- All HTML code will be removed from the imported data.
- If UPDATE: Ignore missing columns!
- Only applicable for UPDATES: If you want to transfer only certain columns from your file, this option must be enabled. That way, only the data from the selected columns in your file is imported and the rest will be ignored. Otherwise, this data would be deleted or overwritten with an "EMPTY" value.
- Incorporate categories from import file
- If your import file contains product categories, you can incorporate these as internal categories in the data pool. Already existing data will be updated at every import. Newly added categories are then created as new internal categories.
- Creating a backup of the old data before importing
- Before importing, a backup of your existing data will be created.
- Währungsumrechnung
- Übernehmen Sie hier bitte immer die Einstellung Standard! Stellen Sie nur dann auf eine bestimmte Währung um, wenn Sie sicher sind was die Funktion bewirkt und wenn Beispiel 4 - wie hier beschrieben - auf Ihren Import zutrifft.
- Import template - Save As
- Save your import settings as a template with a descriptive name, for example, 'IMPORT Template XTCommerce' (if you leave this blank, "default" will be used). This way, you do not have to make - for repeated imports - the columns assignment again and again, but to only choose the appropriate import template. Also, the update of an existing column mapping is possible here.
Watch out!
For the automatic import of data via a cronjob, creating and assigning of an import template is mandatory!
- Als neue Export-Schnittstelle anlegen
- Wenn aktiv, wird anhand der importierten Spalten eine individuelle Schnittstelle generiert (siehe Export ->Individuelle Schnittstellen).
Import Particularities
Parentartikel
Um einen Artikel als Parentartikel zu deklarieren, schreiben Sie in das Feld 'Parent-ID' bei 'erweiterte Optionen' den Wert 'isParent'.
Currency Conversion
For all currency conversions in the export area, the system always starts from prices in EUR. Problems could arise, if you import prices in another currency as the EUR (for example, USD, GBP or SEK) and these prices should be converted again in another currency during the export. This only works, if the prices are converted in EUR during the import into the database (can be set at the import).
The Conversion of prices in EUR during the import is not required, if import and export currency are the same. That means, you can import the prices in USD, if you later also export the prices in USD.
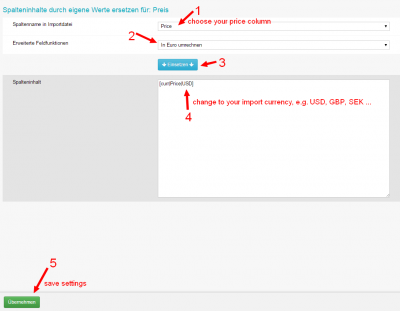
Here is an example of how to convert your prices during the import from USD in EUR:
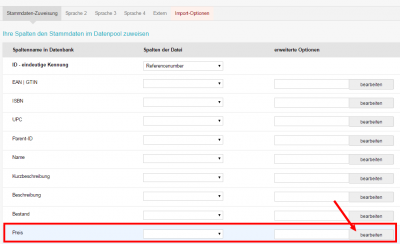
- Price Edit (Data Import -> Master Data -> Columns assignment), edit your column price, which may have a different name in your import file:
- then insert the function, as described in the picture:

